实现 iOS 美颜
添加 SDK 依赖
方法 A:CocoaPods 集成(推荐)
在项目的 Podfile 中添加 Facebetter 依赖:
target 'YourTargetName' do
  # 请替换为最新版本号
  pod 'Facebetter', '1.2.2'
end
执行安装命令:
pod installXcode 15+ 编译错误处理
如果你使用的是 Xcode 15 或更高版本,可能会在编译时遇到 Sandbox: rsync.samba deny(1) 错误。这是由于 Xcode 默认开启了 User Script Sandboxing 导致的。
解决方法:
- 在 Xcode 中选择您的 Project。
- 进入 Build Settings 选项卡。
- 搜索
ENABLE_USER_SCRIPT_SANDBOXING。 - 将该选项的值从
Yes修改为No。
方法 B:手动集成 Framework
前往 下载 页面,获取最新版的 SDK,然后解压。
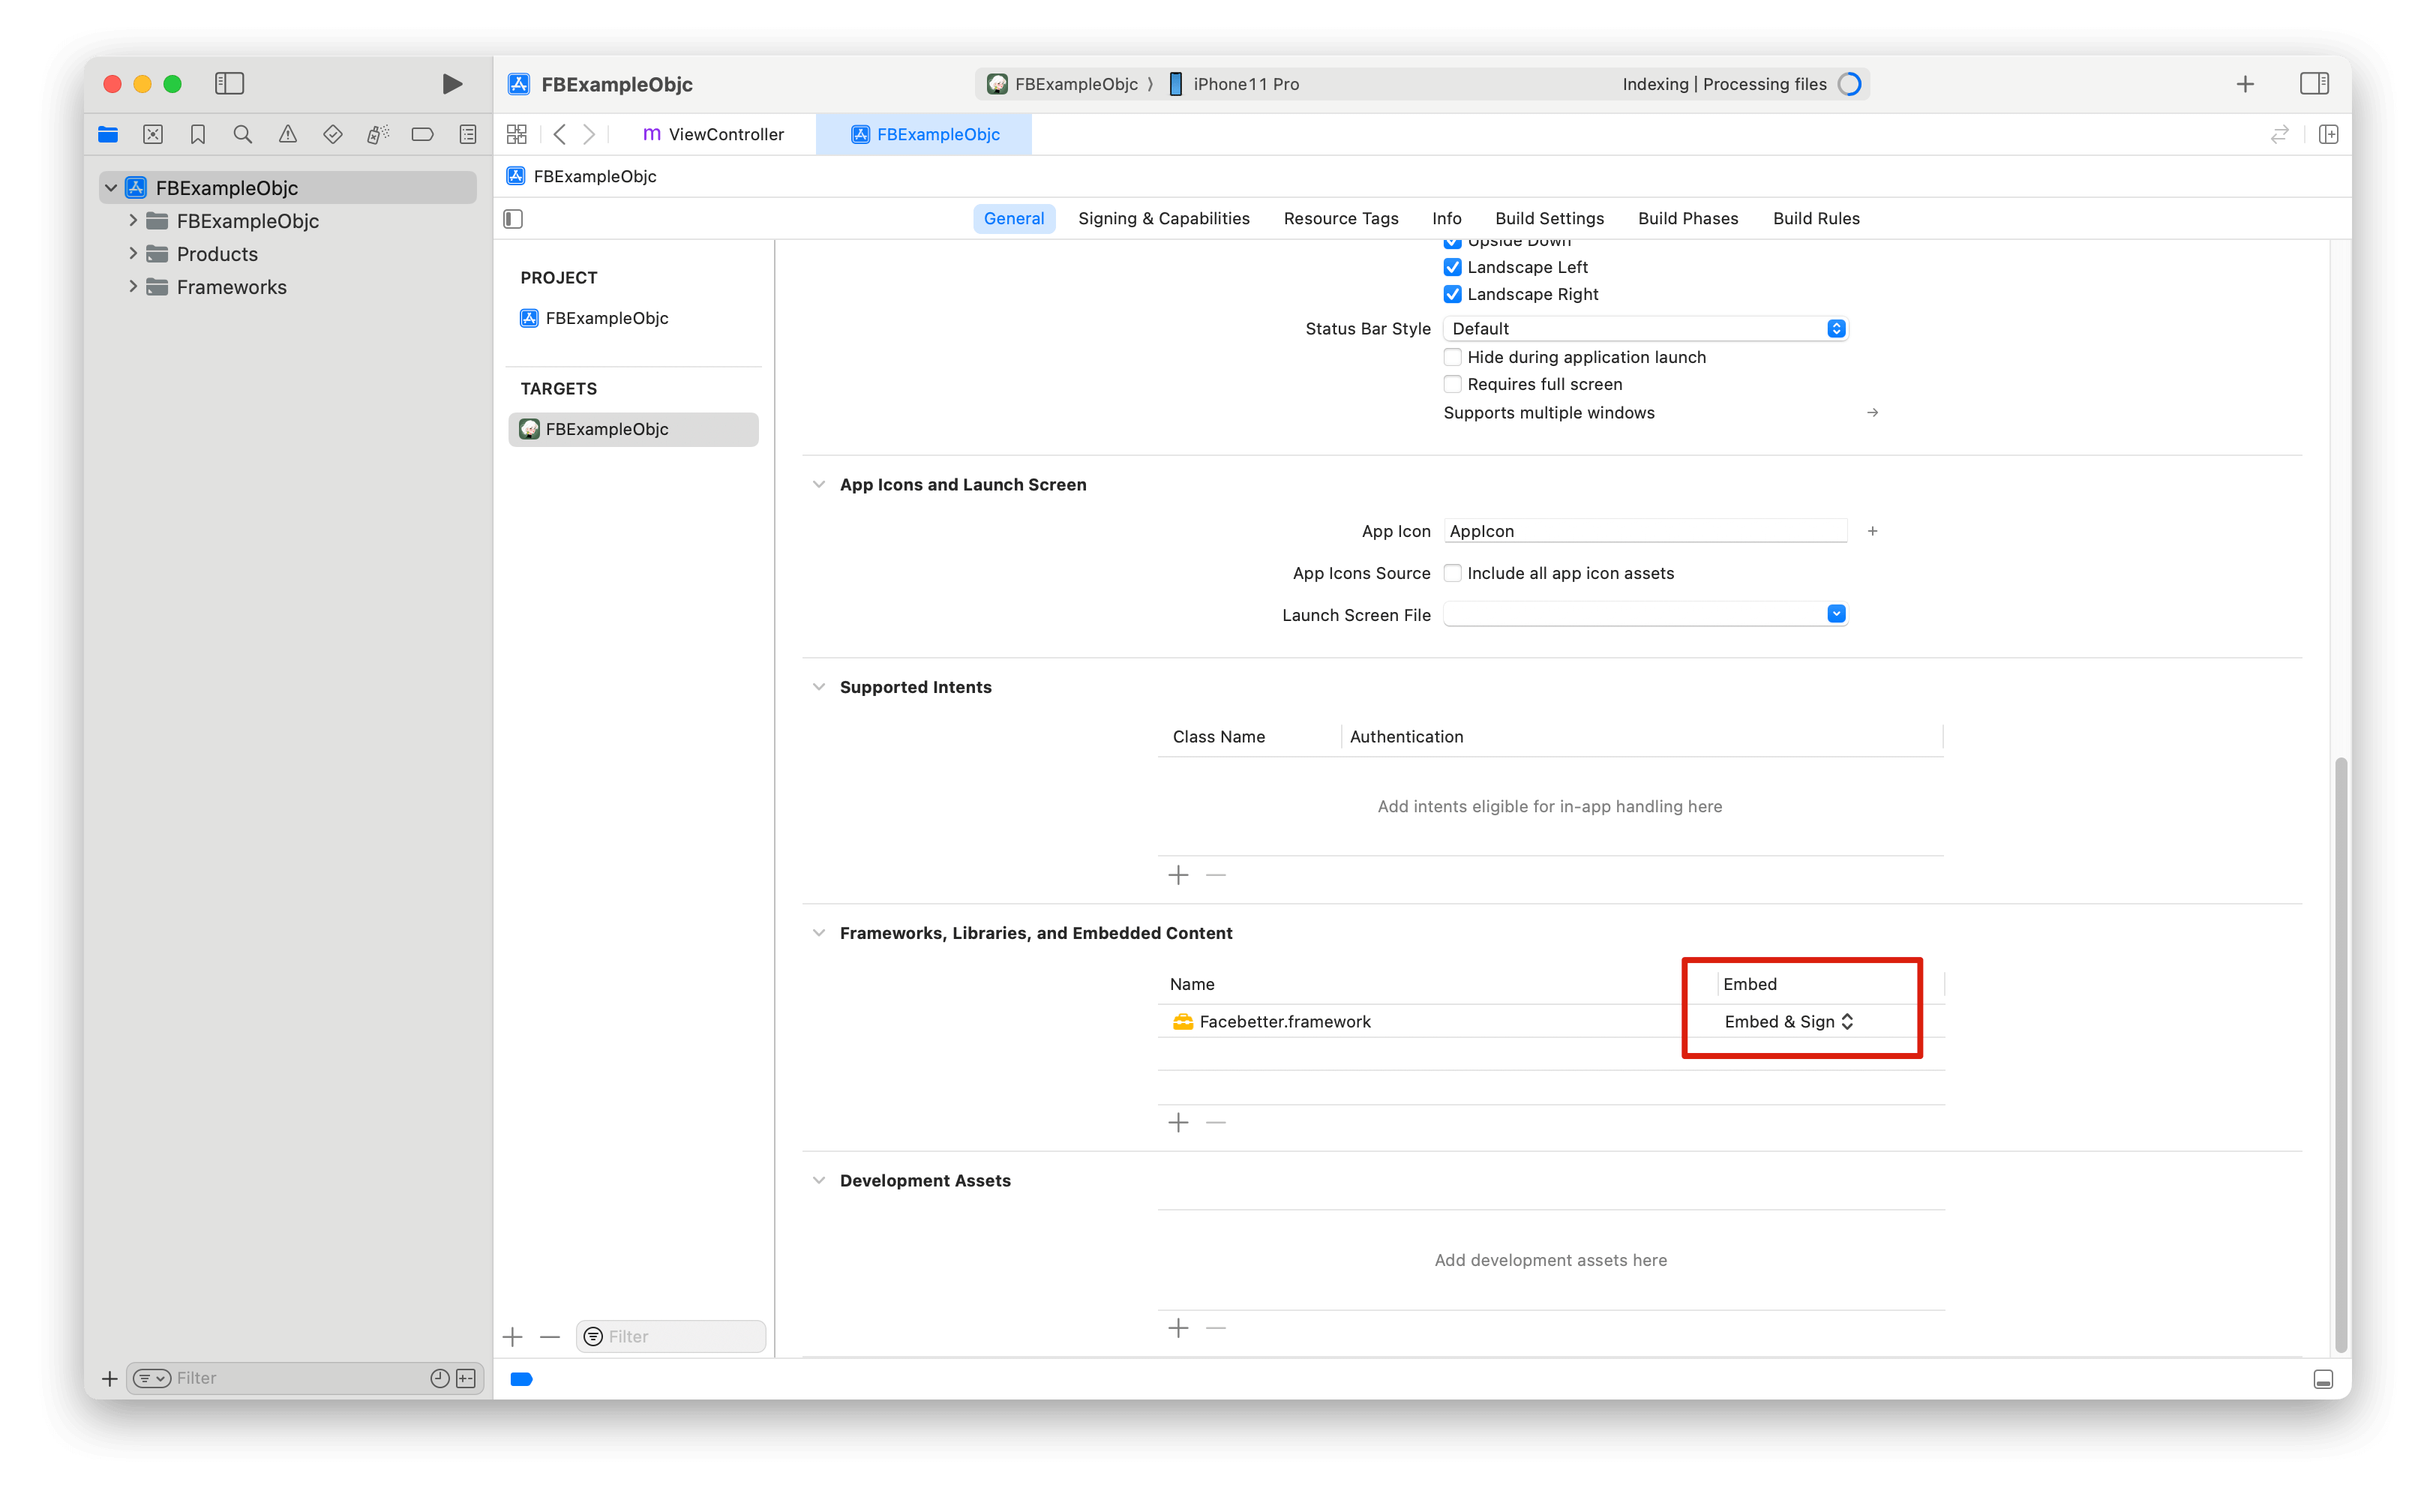
将 SDK 包内 Facebetter.framework 库,拷贝到你的项目路径下。
打开 Xcode,参考这里添加 Facebetter.framework 动态库,确保添加的动态库 Embed 属性设置为 Embed & Sign。
权限配置
在 Info.plist 中添加必要权限:
<!-- 相机权限(可选):仅在 demo 使用相机采集时才需要 -->
<key>NSCameraUsageDescription</key>
<string>需要相机权限进行美颜拍照</string>
权限说明:
- 相机权限:可选。仅在应用中使用相机采集图像进行美颜处理时需要,如果只处理已有图片不需要此权限。
导入头文件
#import <Facebetter/FBBeautyEffectEngine.h>日志配置
默认日志是关闭的,可以按需开启,支持控制台日志和文件日志开关。
WARNING
开启日志要放到美颜引擎创建之前,否则可能看不到初始化日志。
FBLogConfig* logConfig = [[FBLogConfig alloc] init];
// 日志级别
logConfig.level = FBLogLevel_Info;
// 控制台日志
logConfig.consoleEnabled = YES;
// 文件日志
logConfig.fileEnabled = YES;
logConfig.fileName = @"log path: xx/xx/facebetter.log";
创建配置引擎
按照 此页面 指引,获取 appid 和 appkey
验证方式优先级:
- 如果提供了
licenseJson,使用授权数据验证(支持在线响应和离线授权) - 否则使用
appId和appKey进行自动联网验证
FBEngineConfig *engineConfig = [[FBEngineConfig alloc] init];
engineConfig.appId = @"your appId";     // 配置你的 appid(可选,如果提供了 licenseJson 则不需要)
engineConfig.appKey = @"your appkey";   // 配置你的 appkey(可选,如果提供了 licenseJson 则不需要)
// 可选:使用授权数据验证(如果提供则优先使用)
// engineConfig.licenseJson = @"your license json string";
self.beautyEffectEngine = [FBBeautyEffectEngine createEngineWithConfig:engineConfig];
错误处理
创建引擎后建议检查是否成功:
if (self.beautyEffectEngine == nil) {
    NSLog(@"Failed to create beauty engine");
    return;
}
调节美颜参数
TIP
所有美颜参数值范围为 [0.0, 1.0],设置为 0 即禁用效果。
设置美肤参数
通过 setBasicParam 接口,设置美肤参数,参数范围 [0.0, 1.0];
[self.beautyEffectEngine setBasicParam:FBBasicParam_Smoothing floatValue:0.5f];支持的美肤参数:
typedef NS_ENUM(NSInteger, FBBasicParam) {
  FBBasicParam_Smoothing = 0,  // 磨皮
  FBBasicParam_Sharpening,     // 锐化
  FBBasicParam_Whitening,      // 美白
  FBBasicParam_Rosiness,       // 红润
};
设置美颜仅作用于皮肤区域
通过 setSkinOnlyBeauty: 接口,设置美颜是否仅作用于皮肤区域。当启用时,美颜效果(磨皮、美白等)仅会应用于检测到的皮肤区域,非皮肤区域保持不变。
// 启用美颜仅作用于皮肤区域
[self.beautyEffectEngine setSkinOnlyBeauty:YES];

// 禁用美颜仅作用于皮肤区域(美颜作用于整张图像)
[self.beautyEffectEngine setSkinOnlyBeauty:NO];
TIP
启用皮肤区域美颜后,即使美颜参数值较高,非皮肤区域(如背景、衣物等)也不会受到影响。
设置美型参数
通过 setReshapeParam 接口,设置美型参数,参数范围 [0.0, 1.0];
[self.beautyEffectEngine setReshapeParam:FBReshapeParam_FaceThin floatValue:0.5f];支持从美型参数:
typedef NS_ENUM(NSInteger, FBReshapeParam) {
  FBReshapeParam_FaceThin = 0,  // 瘦脸
  FBReshapeParam_FaceVShape,    // V脸
  FBReshapeParam_FaceNarrow,    // 窄脸
  FBReshapeParam_FaceShort,     // 短脸
  FBReshapeParam_Cheekbone,     // 颧骨
  FBReshapeParam_Jawbone,       // 下颌骨
  FBReshapeParam_Chin,          // 下巴
  FBReshapeParam_NoseSlim,      // 瘦鼻梁
  FBReshapeParam_EyeSize,       // 大眼
  FBReshapeParam_EyeDistance,   // 眼距
};
设置美妆参数
[self.beautyEffectEngine setMakeupParam:FBMakeupParam_Lipstick floatValue:0.5f];支持的美妆参数:
typedef NS_ENUM(NSInteger, FBMakeupParam) {
  FBMakeupParam_Lipstick = 0,  // 口红
  FBMakeupParam_Blush,         // 腮红
};
设置虚拟背景
通过 setVirtualBackgroundType:intensity: 接口设置虚拟背景参数即可启用效果:
// 设置模糊背景(参数值 > 0 表示启用)
[self.beautyEffectEngine setVirtualBackgroundType:FBVirtualBackgroundType_Blur intensity:0.5f];

// 设置纯色背景
[self.beautyEffectEngine setVirtualBackgroundType:FBVirtualBackgroundType_Color intensity:0.5f];
通过 setVirtualBackground 接口设置虚拟背景(需要先启用虚拟背景类型):
// 设置背景模式
FBVirtualBackgroundOptions *options = [[FBVirtualBackgroundOptions alloc] initWithMode:FBBackgroundModeBlur];
[self.beautyEffectEngine setVirtualBackground:options];

// 设置背景图片(需要先设置为 Image 模式)
FBVirtualBackgroundOptions *imageOptions = [[FBVirtualBackgroundOptions alloc] initWithMode:FBBackgroundModeImage];
imageOptions.backgroundImage = backgroundImageFrame;  // FBImageFrame 对象
[self.beautyEffectEngine setVirtualBackground:imageOptions];
使用滤镜和贴纸
滤镜功能
滤镜通过 setFilter: 接口设置,需要先通过 registerFilter:fbdFilePath: 注册滤镜资源文件(.fbd)。
// 1. 注册滤镜资源
NSString *filterId = @"chuxin";
NSString *fbdPath = [[NSBundle mainBundle] pathForResource:@"chuxin" ofType:@"fbd"];
[self.beautyEffectEngine registerFilter:filterId fbdFilePath:fbdPath];

// 2. 使用滤镜
[self.beautyEffectEngine setFilter:filterId];

// 3. 调节滤镜强度 (0.0 - 1.0)
[self.beautyEffectEngine setFilterIntensity:0.8f];
贴纸功能
贴纸通过 setSticker: 接口设置,同样需要先注册。
// 1. 注册贴纸资源
NSString *stickerId = @"cherry";
NSString *fbdPath = [[NSBundle mainBundle] pathForResource:@"cherry" ofType:@"fbd"];
[self.beautyEffectEngine registerSticker:stickerId fbdFilePath:fbdPath];

// 2. 使用贴纸
[self.beautyEffectEngine setSticker:stickerId];

// 3. 清除贴纸
[self.beautyEffectEngine setSticker:@""];
设置引擎回调
监听License验证和引擎初始化状态:
FBEngineCallbacks *callbacks = [[FBEngineCallbacks alloc] init];
callbacks.onEngineEvent = ^(FBEngineEventCode code, NSString* _Nullable message) {
    if (code == FBEngineEventCodeLicenseValidationSuccess) {
        // License验证成功
        NSLog(@"License验证成功");
    } else if (code == FBEngineEventCodeLicenseValidationFailed) {
        // License验证失败
        NSLog(@"License验证失败: %@", message);
    } else if (code == FBEngineEventCodeInitializationComplete) {
        // 引擎初始化完成
        NSLog(@"引擎初始化完成");
    } else if (code == FBEngineEventCodeInitializationFailed) {
        // 引擎初始化失败
        NSLog(@"引擎初始化失败: %@", message);
    }
};
[self.beautyEffectEngine setCallbacks:callbacks];
事件码:
FBEngineEventCodeLicenseValidationSuccess(0):License验证成功FBEngineEventCodeLicenseValidationFailed(1):License验证失败FBEngineEventCodeInitializationComplete(100):引擎初始化完成FBEngineEventCodeInitializationFailed(101):引擎初始化失败
处理图像
创建图像
图像数据通过 FBImageFrame 封装,支持格式: YUVI420, NV12, NV21, RGB, RGBA, BGR, BGRA
通过 rgba 创建 FBImageFrame
FBImageFrame *input_image = [FBImageFrame createWithRGBA:data width:width height:height stride:stride];通过图片创建 FBImageFrame
FBImageFrame *input_image = [FBImageFrame createWithFile:@"xxx.png"];旋转图像
FBImageFrame 内置图像旋转方法, 可根据需要使用
- (int)rotate:(FBImageRotation)rotation;旋转角度
typedef NS_ENUM(NSInteger, FBImageRotation) {
  FBImageRotation0,    // 0度
  FBImageRotation90,   // 顺时针旋转90度
  FBImageRotation180,  // 顺时针旋转180度
  FBImageRotation270,  // 顺时针旋转270度
};
处理图像
processMode 包括 Video 和 Image 两种,Video 适合直播,视频等场景使用,效率更高,Image 模式适合图片处理场景
input_image.type = FBFrameTypeVideo;
FBImageFrame *output_image = [self.beautyEffectEngine processImage:input_image];
TIP
引擎会自动保持输入输出格式一致。输入为 RGBA 格式,输出即为 RGBA 格式;输入为 I420 格式,输出即为 I420 格式。
获取处理后图像数据
获取 RGBA 格式数据:
// 如果输出格式是 RGBA,直接获取数据
if ([outputImage format] == FBImageFormatRGBA) {
    const uint8_t* data = [outputImage data];
    int dataSize = outputImage.size;
    int width = outputImage.width;
    int height = outputImage.height;
    int stride = outputImage.stride;
}
获取 I420 格式数据:
// 如果输出格式是 I420,直接获取 Y、U、V 分量数据
if ([outputImage format] == FBImageFormatI420) {
    // 独立获取 Y, U, V 分量数据
    const uint8_t* dataY = [outputImage dataY];
    const uint8_t* dataU = [outputImage dataU];
    const uint8_t* dataV = [outputImage dataV];

    int strideY = [outputImage strideY];
    int strideU = [outputImage strideU];
    int strideV = [outputImage strideV];

    int width = outputImage.width;
    int height = outputImage.height;
}格式转换:
如果需要将 FBImageFrame 转换为其他格式,可以使用 convert: 方法:
// 转换为 I420 格式
FBImageFrame *i420Frame = [outputImage convert:FBImageFormatI420];
if (i420Frame) {
    uint8_t* dataY = [i420Frame dataY];
    uint8_t* dataU = [i420Frame dataU];
    uint8_t* dataV = [i420Frame dataV];
    // 使用完毕后,ARC 会自动释放
}

// 转换为 RGBA 格式
FBImageFrame *rgbaFrame = [outputImage convert:FBImageFormatRGBA];
if (rgbaFrame) {
    const uint8_t* data = [rgbaFrame data];
    // 使用完毕后,ARC 会自动释放
}
FBImageFrame 支持转换为以下格式: I420, NV12, NV21, RGB, RGBA, BGR, BGRA。
外部纹理处理
WARNING
使用外部纹理处理时,必须确保 OpenGL ES 上下文在主线程,且在引擎初始化时传入 externalContext = YES。
使用场景
外部纹理处理适用于以下场景:
- OpenGL ES/Metal 渲染管线集成:当你的应用已经使用 OpenGL ES 或 Metal 进行渲染时,可以直接使用纹理作为输入和输出,避免 CPU-GPU 之间的数据拷贝
- 实时视频处理:在视频渲染回调中直接处理纹理,减少内存拷贝开销
- 性能优化:避免将纹理数据下载到 CPU 内存再上传回 GPU,提升处理效率
配置外部上下文
使用外部纹理处理时,需要在创建引擎时启用 externalContext 选项:
FBEngineConfig *engineConfig = [[FBEngineConfig alloc] init];
engineConfig.appId = @"your appId";
engineConfig.appKey = @"your appKey";
engineConfig.externalContext = YES;  // 启用外部上下文模式

self.beautyEffectEngine = [FBBeautyEffectEngine createEngineWithConfig:engineConfig];重要提示:
externalContext = YES时,引擎不会创建自己的 OpenGL 上下文,而是使用当前线程的 OpenGL 上下文- 必须在有效的 OpenGL 上下文中创建引擎和处理图像
- 输入和输出的纹理必须在同一个 OpenGL 上下文中
创建纹理帧
使用 FBImageFrame.createWithTexture: 方法从 OpenGL 纹理创建图像帧:
// 从 OpenGL 纹理创建 FBImageFrame
GLuint textureId = ...;  // 你的 OpenGL 纹理 ID
int width = 1920;
int height = 1080;
int stride = width * 4;  // RGBA 格式,每像素 4 字节

FBImageFrame *inputFrame = [FBImageFrame createWithTexture:textureId
                                                      width:width
                                                     height:height
                                                     stride:stride];
if (!inputFrame) {
    NSLog(@"Failed to create FBImageFrame from texture");
    return;
}参数说明:
textureId:OpenGL 纹理 ID(GL_TEXTURE_2D类型)width:纹理宽度(像素)height:纹理高度(像素)stride:行跨度(字节),通常为width * 4(RGBA 格式)
获取输出纹理
处理图像后,可以直接通过 FBImageFrame.texture 属性获取输出纹理:
// 处理图像
inputFrame.type = FBFrameTypeImage;
FBImageFrame *outputFrame = [self.beautyEffectEngine processImage:inputFrame];
if (!outputFrame) {
    NSLog(@"processImage returned nil");
    return;
}

// 获取输出纹理 ID 和尺寸
GLuint outputTextureId = [outputFrame texture];
int outputWidth = outputFrame.width;
int outputHeight = outputFrame.height;

if (outputTextureId == 0) {
    NSLog(@"Output frame does not have a texture");
    return;
}
完整示例
@interface ExternalTextureViewController ()
@property (nonatomic, strong) FBBeautyEffectEngine *engine;
@end

@implementation ExternalTextureViewController

- (int)processVideoFrame:(GLuint)inputTexture
                  width:(int)width
                 height:(int)height
              outputTexture:(GLuint *)outputTexture {

    // 延迟初始化引擎(在 OpenGL 上下文中)
    if (!self.engine) {
        FBEngineConfig *config = [[FBEngineConfig alloc] init];
        config.appId = @"your appId";
        config.appKey = @"your appKey";
        config.externalContext = YES;  // 关键:启用外部上下文

        self.engine = [FBBeautyEffectEngine createEngineWithConfig:config];
        [self.engine setBasicParam:FBBasicParam_Smoothing floatValue:0.5f];
    }

    // 从输入纹理创建 FBImageFrame
    int stride = width * 4;
    FBImageFrame *inputFrame = [FBImageFrame createWithTexture:inputTexture
                                                          width:width
                                                         height:height
                                                         stride:stride];
    if (!inputFrame) {
        return -1;
    }

    // 处理图像
    inputFrame.type = FBFrameTypeImage;
    FBImageFrame *outputFrame = [self.engine processImage:inputFrame];
    if (!outputFrame) {
        return -2;
    }

    // 获取输出纹理 ID
    GLuint outputTextureId = [outputFrame texture];
    if (outputTextureId == 0) {
        return -3;
    }

    // 返回输出纹理 ID
    *outputTexture = outputTextureId;

    return 0;  // 成功
}

@end
注意事项
1. 上下文要求
- 必须在有效的 OpenGL 上下文中创建引擎:
externalContext = YES时,引擎使用当前线程的 OpenGL 上下文,因此必须在 OpenGL 渲染线程中创建引擎 - 上下文一致性:输入纹理、引擎处理、输出纹理必须在同一个 OpenGL 上下文中
- 线程安全:OpenGL 操作必须在同一个线程中执行
2. 纹理格式要求
- 输入纹理格式:支持
GL_RGBA格式的GL_TEXTURE_2D纹理 - 纹理参数:建议设置以下纹理参数以获得最佳效果:objc
glTexParameteri(GL_TEXTURE_2D, GL_TEXTURE_MIN_FILTER, GL_LINEAR);
glTexParameteri(GL_TEXTURE_2D, GL_TEXTURE_MAG_FILTER, GL_LINEAR);
glTexParameteri(GL_TEXTURE_2D, GL_TEXTURE_WRAP_S, GL_CLAMP_TO_EDGE);
glTexParameteri(GL_TEXTURE_2D, GL_TEXTURE_WRAP_T, GL_CLAMP_TO_EDGE);
3. 性能优化
- 延迟初始化:在首次渲染回调中初始化引擎,确保在正确的 OpenGL 上下文中创建
- 复用 FBImageFrame:如果可能,复用
FBImageFrame对象以减少对象创建开销 - 处理模式选择:
FBFrameTypeVideo:适合实时视频流处理,性能更高FBFrameTypeImage:适合单帧图片处理,质量更好
4. 内存管理
- ARC 自动管理:iOS 使用 ARC 自动管理内存,但仍需注意及时释放不再使用的对象
- 纹理生命周期:输出纹理由引擎管理,不需要手动删除,但输入纹理需要由调用方管理
- 避免循环引用:在 block 或回调中使用
self时,注意使用__weak避免循环引用 - 格式转换后的对象:使用
convert:转换后的 FBImageFrame 对象,ARC 会在适当时候自动释放
5. 错误处理
- 检查返回值:所有 API 调用都应该检查返回值
- 空指针检查:检查
createWithTexture:和processImage:的返回值是否为nil - 纹理有效性:确保输入纹理 ID 有效且已绑定到当前 OpenGL 上下文
6. 常见问题
- 引擎创建失败:检查是否在 OpenGL 上下文中创建,以及
externalContext是否正确设置 - 纹理处理失败:检查纹理格式是否为 RGBA,纹理参数是否正确设置
- 上下文丢失:如果 OpenGL 上下文被销毁,需要重新创建引擎
生命周期管理
TIP
FBBeautyEffectEngine 是单例,App 结束时自动释放,无需手动管理。
释放资源
在 ViewController 销毁时,务必释放引擎资源:
- (void)dealloc {
    if (self.beautyEffectEngine) {
        // 注意:FBBeautyEffectEngine 是单例,通常不需要手动释放
        // 但如果有自定义的清理逻辑,可以在这里处理
        self.beautyEffectEngine = nil;
    }
}
内存管理
- 及时释放
FBImageFrame对象(ARC 会自动管理) - 避免在循环中重复创建大量图像对象
- 建议复用
FBImageFrame对象
// 使用完毕后释放资源
if (inputImage) {
    inputImage = nil; // ARC 会自动释放
}
if (outputImage) {
    outputImage = nil; // ARC 会自动释放
}
// 格式转换后的 frame,ARC 也会自动释放
if (i420Frame) {
    i420Frame = nil; // ARC 会自动释放
}